
Sonicu's Implementation Wizard is designed to increase the ease of protecting your assets and setting up your SoniCloud monitoring platform. After completing the Implementation Wizard, your personalized Sonicu Monitoring site will be ready to monitor your assets and notify you in the event of an excursion. Your site will be organized and with your Site Dashboard, prioritized to make sure you have the most important information at your fingertips.
Site Configuration
There are several options on this page to help make sure your site is set up to your desired specifications.
- The "Site Name" section will come pre-configured with a name based on what your Customer Success Manager entered when creating your site. If you would like to make any changes to what was entered, this section is the place to do it.

- The next option will allow you to select your default temperature scale. The option that is highlighted in blue will be the default.

- The third option on this page is a time zone selection. This will once again be pre-configured by your CSM but can be changed here if deemed necessary.

- The final option on this page allows you to select whether or not your site's "view" users should set their own alarm notifications methods. View users by default CANNOT set their own notification methods.
Note: If you choose to allow view users to set their own notification methods, they will not be able to make edits at a later date, any edits will need to be made by a site administrator.

User Creation
This is where you will add any users to your site and determine their permission level.
- This page will show you any users that have been added to your site if you click the "Show Users" button at the top of the page.

- The information needed for user creation is very minimal. You only need a first name, last name, and email address.

- The final option on this page is "Make this person an Admin?". If you toggle this on for a user you are creating, that user will have admin privileges, including but not limited to user creation, alarm profile editing, and point/zone/area editing. Generally, the fewer admins per site the better.

Group Creation
Using groups, you can segregate your users in such a way that they will only see the points of monitoring that pertain to them. This will help your different departments focus on what is important to them, instead of being bogged down with everything that your entire site is monitoring.
- Change the group name to something easily understood. Common group names are things like "Pharmacy", "Lab", "Peds", and "NICU".
- Right next to the group name is a drop-down selection box. This will populate with all of the users you added during the "User Creation" step. Select everyone that you'd like in each group (one user can be in as many groups as you'd like that user to be in).

- You can create more groups by typing the name of the new group you are creating in the "New Group Name" box and clicking the "Add This New Group" button.
- If you don't plan on using groups, you can simply click the "Skip Group Creation" button at the top of the page.
Alarm Profiles
This step is where you will set up the different threshold settings to meet your alarming needs.
Tip: You only need 1 alarm profile for each set of thresholds. Do you have several refrigerators with a high threshold of 45 and a low threshold of 32? Just make one profile! You can apply it to multiple different devices!
- All of our default alarm profiles will start as "disabled". On the right-hand side of each profile, you can duplicate a profile that already exists (use the "duplicate" button), and you can delete any profiles that you do not need.

- To enable an alarm profile all you need to do is click the toggle on the left-hand side of each alarm profile. The "disabled indicator will switch to a green "enabled" indicator, and the edit button on the right-hand side will become useable.

- To customize a profile, click the edit button. Once the alarm profile expands, you can change the name (Profile Name) and the high and low thresholds (Red upward arrow for the high threshold, blue downward arrow for the low threshold.). The last setting here is in the alarm buffer. The options here are Default (35 Minutes), 1 hour, and 2 hours of buffer time before an alarm is actually generated.
(Example: Your Sonicu Sensor registers a temperature out of thresholds at 12 noon. An alarm will not be generated until 12:35 (default), 1 PM (1 hour), or 2 PM(2 hours) based on your selected buffer time.)
- After you have finished editing the alarm profile, click the "stop editing" button to save your changes.
Layout
This step will help you break down your site into your different buildings or departments, and is generally a 1-1 parallel with groups (If there is a NICU group, there is almost always a NICU area or zone, and vice versa.)
- "Areas" are generally used to indicate different large groupings of points, such as different buildings, or in larger facilities different departments. They are shown as different options on the left-hand side of your site, and can only be viewed one at a time.

- "Zones" are different sections of points that occur within an area. These are often smaller departments or specific rooms in a department

- On the actual "Layout" page of the Implementation Wizard, you can change the name of your initial area, and create additional areas by typing the name of the new area you'd like to create in the "New Area Name" box, and then clicking the "Create New Area" Button

- Once you've created your areas, you can click the karat on the right-hand side of the "Area" box to create and name the zones that exist in each area. This is also where you will assign the groups that you created in step 3. All groups will appear under the dropdown menu, and you can assign each group to as many zones as you would like. Once you have named each zone, and assigned the appropriate groups, make sure to click the "save" button to save your changes.

Report Setup
Sonicu has several reports to help you clearly understand your data and the status of your meters and sensors. On this page, you will set up two such reports to be automatically sent to you.
The first report is the "Data Logging Report" also known as the "Monthly Data Logs". This report gives you the daily minimum, maximum, twice daily data readings, and a graphical summary. This is ideal for users who want a regulatory compliance-focused report delivered to them automatically. CLICK HERE for an example.
The second report is the "Point Summary Report" also known as the "Device Summary Report". This is a management-focused report that shows minimum, maximum, and average readings, and alarms. This helps provide an easily understandable overview of the status of your SoniCloud system. CLICK HERE for an example.
- To start receiving these reports to the email address on your account, all you have to do is use the drop-down selectors on this page of the implementation wizard and add all desired users.

Shipping
The shipping step marks the end of the initial setup of your Sonicu Monitoring site. The Shipping Step is completed by the Sonicu production team once your order has passed our quality assurance requirements and has been shipped to you.
Connectivity
The connectivity step will give you transparency into which of the devices from your order have successfully connected and transmitted to our servers.
- Devices that have not checked in yet will show as "Waiting for check-in!"

- Devices that have checked in but have not been confirmed by an administrator will show with two options, the first being "Device is good!" and the second being "Something's not right...". If the device shows the correct device type and topology and shows the correct probe types attached to it, you can click "Device is good!". If you're noticing any issues with the information being presented, click "Something's not right..." for some help with figuring out how to fix the issues!

- If you clicked "Something's not right..." It gives you two links to some of our most common implementation issues. You can also add notes and skip that device if you'd rather come back to it later. Once you do resolve the issues you can click the "Device is good!" button to verify that the device has connected successfully.

- Once you have verified that a device has connected successfully and hit the "Device is good!" button, that device will move to the bottom of the list and be highlighted in green.

Point Setup
The Point setup page of the Implementation Wizard is where you will name your individual points, as well as assign them to the specific zones that were set up in step 5.
- The name of each point should be descriptive enough so that you know exactly which unit it is referring to. The name of the point is what will display on your Sonicu Monitoring site, as well as what will be communicated to you in the event of an excursion. The dropdown menu is where you will select which zone that point belongs. The text box indicating "Point Name" is where you will enter the name for that point.

- Once you have assigned a zone and a name to a point, click the save button.
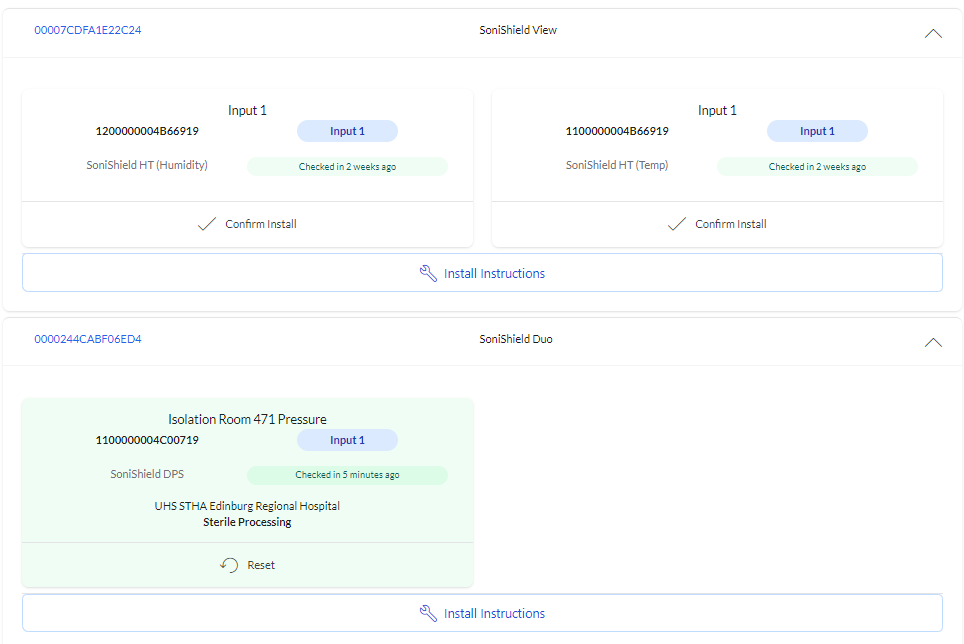
Physical Install
The Physical Install step of the Implementation Wizard is the only step that acts as a true checklist. Here you will see each device listed and broken down per input, with the names you assigned them in the previous step
- Each individual point will give you the option to confirm the installation, and even after you confirm an installation you can always go back and reset so that you can make sure that all installations are completed to your satisfaction. This section also has a link at the bottom of it to take you to our installation instructions.
Alarm Activation
Alarm activation is the final stage of the Implementation Wizard. This step will get all of your alarm profiles assigned to the correct points. Buffer settings and a few other alarm specifications will be made via the alarm profiles page.
- Using the dropdown boxes for each Area and Zone, assign your users to the locations where each of them should be receiving alarms from.
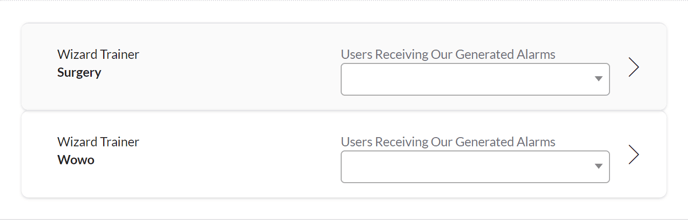
- Using the carats on the right-hand side of each location, expand them to reveal each point that has been assigned to each location. Once you do this, you'll be able to assign the alarm profiles that you created in step 4.

COMPLETE!!!
The Implementation wizard is now complete! All of the basics are now set up for your site!