
Once the installation of your SoniShield View is complete, please follow these steps to activate your View.
1. Open the SoniCloud mobile app which should have been installed on your cellular device during the kick-off call and log in. If you have not yet downloaded the SoniCloud mobile app, please use the QR code to download the app and use your SoniCloud login credentials to log in.

2. On the “Settings” page of the SoniCloud Mobile app, select “Scan for SoniShield Meters (BLE)”. The SoniCloud Mobile app will then list any Views that have been powered on and are in proximity.

3. Select the View that you are currently implementing by either typing the last 4 numbers/letters from the serial number on the View as shown on the screen or scrolling down the list to locate the correct serial number. Select the meter, and the SoniCloud Mobile app will read the configuration of the SoniShield View.

4. A page of options will appear. Select Implementation Wizard if the Network Questionnaire was completed and provided to Sonicu prior to shipping. If the Network Questionnaire was not provided or provided after shipping, please follow the instructions on #10 or #11.


5. Click Get Started and follow the steps (see pictures below)

6. To configure audible alarms on the View, or update the title text that appears at the top View Screen, you may do so on the mobile app.

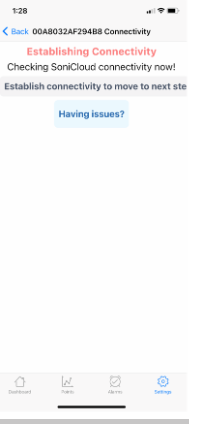
7. The next step is connectivity. Your View meter should automatically connect and will turn from red Establishing Connectivity to green indicating Connected! Click Next Step.


8. Your first View and point have now been set up and can be seen on the SoniCloud Dashboard.

9. Perform the same process above for the rest of the meters and the sensors to complete the installation process.
Programming your Meters On-Site
10. If the Customer’s network information was not provided to Sonicu for pre-programming, the View meters must be configured with the customer’s Wifi SSID & Passkey before installation. Sonicu strongly recommends completing Network Questionnaire or contacting your Sonicu Customer Success Manager to get a profile template set up if you’re doing multiple meters, and skipping to the next step!

Once SSID and Passphrase have been entered and updated, return to Implementation Wizard to complete the installation of hardware (Step #4).
11. If your Network Questionnaire was received after the shipment of your hardware, Sonicu will provide a Device Profile Template that includes your network settings. Please select this option and follow the instructions.

12. Once the Device Profile Template has been applied to each View meter, please continue with the Implementation Wizard to complete the installation of Sonicu hardware.
The Implementation Wizard can be completed on your SoniCloud Dashboard on your computer if you prefer to do so. Access the Implementation Wizard at sonicumonitoring.com to complete the Point Setup and verify your meters are connected and transmitting.

If any questions arise during your View Activation, please contact Sonicu Support for assistance. Sonicu Support can be reached by email at support@sonicu.com or by calling (317) 468-2345. Sonicu Support is available M-F 8 am-5 PM EST.