
Application: This guide applies to SoniLink Hub installations using Ethernet, Cellular, or Power over Ethernet (PoE) connectivity.
1. Introduction
The SoniLink Hub is the communication gateway between Sonicu wireless monitoring devices and SoniCloud. It receives wireless data from compatible Sonicu sensors and meters and securely transmits that information to SoniCloud for alarming, reporting, notifications, and long-term data storage.
Proper Hub placement is one of the most important factors in a successful installation. Because SoniLink communication is point-to-point, the Hub should be installed in a location that provides the best possible wireless coverage to all connected devices.
This guide provides step-by-step instructions for installing, configuring, verifying, and activating your SoniLink Hub.
Quick Installation Workflow
|
Step |
Task |
|
1. Plan |
Verify the installation location and required materials. |
|
2. Prepare |
Confirm power and network availability. |
|
3. Install |
Mount the Hub and connect power and network communications. |
|
4. Verify |
Confirm Hub communication and assign the Hub to the proper Area & Zone. |
|
5. Complete |
Perform final verification and customer acceptance. |
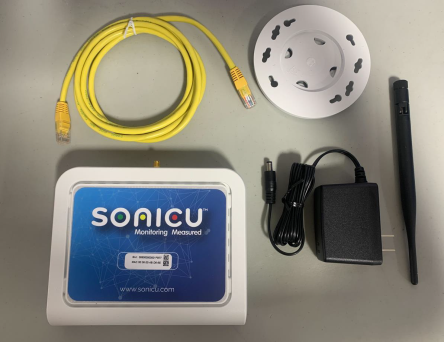
2. Required Tools & Materials
Required Tools
- Mobile phone or tablet with the SoniCloud Mobile App
- Phillips screwdriver
Required Materials
- SoniLink Hub
- Hub antenna
- Power supply
- Ethernet cable (if applicable)
- Optional wall mounting plate
3. Hub Placement Guidelines
Selecting the proper Hub location is critical for reliable wireless communication.
Recommended Locations
- Hallways
- Central corridors
- Nurse stations
- Equipment rooms with minimal obstructions
- Centralized locations within the monitoring area
Avoid Installing Near
- Electrical rooms
- Elevator shafts
- Metal cabinets
- Mechanical rooms
- Concrete walls
- Large metal equipment
Best Practices
- Install the Hub as close to the center of the monitored area as practical.
- Minimize the number of walls between the Hub and monitored devices.
- Verify Hub communication before installing sensors.
- Keep the antenna in a vertical position whenever possible.
Good to Know
SoniLink communication is point-to-point. Every wall, ceiling, or metal obstruction between the Hub and a monitored device can reduce signal strength.
4. Pre-Installation Requirements
Before beginning the installation, verify the following:
☐ Hardware order has been received and verified.
☐ AC power is available.
☐ Ethernet jack is active with HDCP (if applicable).
☐ Installation location has been approved.
☐ Required tools and materials are available.
Important
If multiple SoniLink Hubs are being installed, label each Hub before installation. Use a descriptive name that matches its physical installation location (for example, 1st Floor East Hallway, Mechanical Room, or ICU Nurse Station). When configuring the Hub in SoniCloud, use the same location name for the Hub title. Consistent naming simplifies installation, future maintenance, troubleshooting, and technical support
5. Physical Installation
Step 1 – Select the Installation Location
Locate the approved installation location.
Whenever possible, mount the Hub in a centralized location to maximize wireless communication with all monitored devices.
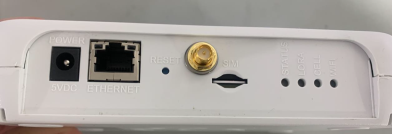
Step 2 – Install the Antenna
Attach the supplied antenna to the threaded connector on the Hub.
Hand-tighten until snug.
Do not overtighten the antenna connection.
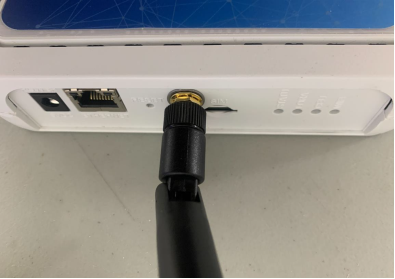
Good to Know
For the best wireless performance, keep the antenna in a vertical position.
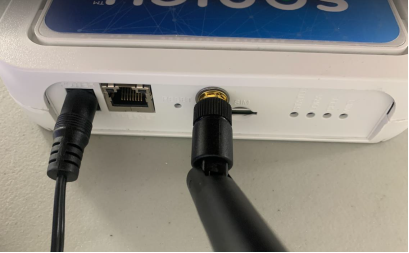
Step 3 – Connect Power
The Hub can be powered using either of the following methods.
Standard Power Supply
- Connect the supplied power adapter to the Hub.
- Plug the adapter into a standard electrical outlet.
Power over Ethernet (PoE)
- Connect an Ethernet cable from the active PoE switch to the Ethernet port on the Hub.
- The Hub will begin powering on automatically.
Important
The Hub must remain powered throughout the installation and configuration process.
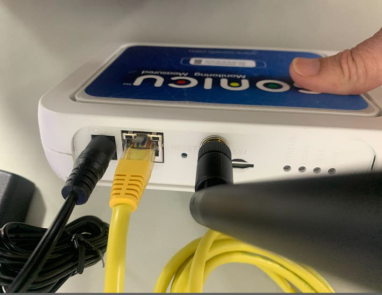
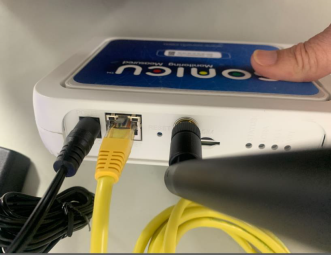
Step 4 – Connect Ethernet (If Applicable)
If using Ethernet instead of Cellular:
- Connect the Ethernet cable to the Hub.
- Verify the cable is connected to an active network port.
Step 5 – Install the Optional Wall Mount
If desired:
- Attach the wall mounting plate to the rear of the Hub.
- Secure the Hub using appropriate mounting hardware.
- Confirm the Hub is securely mounted.
Step 6 – Allow the Hub to Initialize
After power has been applied:
- Allow approximately 15 minutes for the Hub to complete initialization.
- The Hub will automatically establish communication and create a point within SoniCloud.
- No additional activation is required.
Good to Know
Cellular Hubs arrive preconfigured and require no customer network configuration.
Ethernet and PoE models require an active network connection.
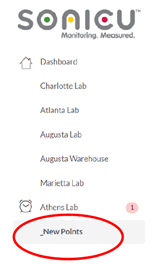
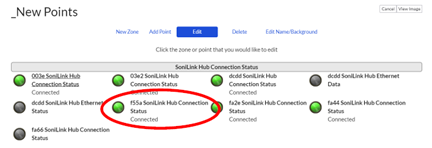
6. Assign the Hub to the Correct Area & Zone within SoniCloud
- Log into SoniCloud.
- Open New Points.
- Verify Hub connectivity that the installed Hub’s “Connection Status” is green and indicates Connected.
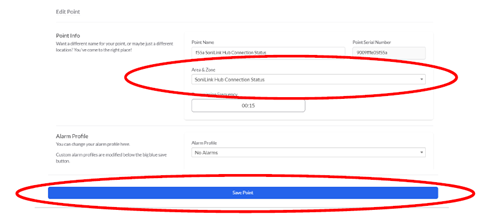
- Click “Edit” and open the point configuration on the hub’s “Connection Status”.
- Select the correct Area & Zone where the hub is physically located.
- Save the changes.
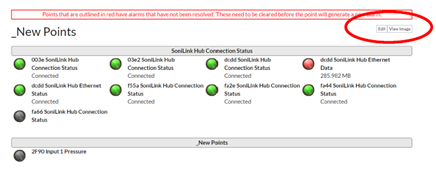
The Hub will now appear in the proper monitoring location on the dashboard.
8. Installation Verification
Verify the following before leaving the installation site.
☐ Antenna installed
☐ Hub powered
☐ Ethernet connected (if applicable)
☐ Hub communicating
☐ Hub assigned to the correct Area & Zone
☐ Customer has verified installation
9. Common Installation Errors
- Installing the Hub inside a metal enclosure.
- Installing too far from monitored devices.
- Not installing the antenna.
10. Troubleshooting
If the Hub does not appear online:
- Verify power is connected.
- Verify Ethernet or cellular connectivity.
- Confirm the antenna is securely attached.
- Allow at least 15 minutes for initialization.
- Verify the Hub appears within New Points.
- Restart the Hub if necessary.
If communication cannot be established, contact Sonicu Technical Support.
11. Technical Support
Email: support@sonicu.com
Phone: 317-468-2345
Hours:
Monday – Friday
8:00 AM-5:00 PM EST